Continuing our weekly series on building a free playground for SQL Server, this week we’ll take a look at configuring our iSCSI Target to create the LUNs necessary to build a SQL Server Failover Cluster, and then build out a two node SQL Server Failover Cluster in the environment. A number of really good comments have been made by readers on the last two blog posts in this series and I want to call out of of them at the beginning of this blog post because it is fairly important to the environment and a step I skipped covering as a part of the blog posts.
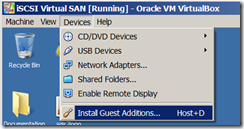
The VM Tools or Guest Additions should be added to each of the VMs that are configured in the playground environment. This can be accomplished in VirtualBox from the Devices menu with the Install Guess Additions… menu item.
The Guest Additions provide seamless integration between the host environment and the VM guest for things like the clipboard, USB device support in the VM, and mouse integration.
The second item that I wanted to cover is that the iSCSI Target being used in these blog posts requires hardware virtualization to be able to create the 64-bit VM for Windows Server 2008 R2 that is required to use the Microsoft iSCSI Target. Most modern laptops support hardware virtualization in the CPU, but if you are using an older laptop or desktop that doesn’t have hardware virtualization extensions in the CPU you won’t be able to use the same iSCSI Target that I am using in this blog series. There is another free alternative available from Starwind Software, a third party software vendor that offers the Starwind Free Edition – iSCSI SAN with Deduplication, for download. You can use this iSCSI target in lieu of the Microsoft iSCSI Target if you don’t have hardware virtualization support on the computer that you are using to build your playground environment.
A few people have asked me why I chose to use the Microsoft iSCSI Target over Openfiler, Starwind’s free iSCSI SAN, or other third party products that can be used to build an iSCSI environment, and the reason for the decision to go with the Microsoft iSCSI Target is that it supports all of the features required for building a Windows Server 2008/2008R2 failover cluster for free, and it doesn’t require any kind of registration to download. I’ve used the Starwind iSCSI SAN software in the past when I was first learning how to use failover clustering in Windows Server 2008 and SQL Server 2008, and it provides all of the functionality required, but you have to register on their site to download it. I have also used Openfiler in the past to build a Windows Server 2003 failover cluster for SQL Server 2005, but OpenFiler does not support SCSI-3 Persistent Reservations, at least as recently as the last time that I looked at it, which are required for building a Windows Server 2008/2008R2 failover cluster, so it wasn’t a viable option for building out a playground environment for SQL Server clustering.
Creating the cloned VMs for the Failover Cluster
The first step in the process of creating a SQL Server Failover Cluster in our playground is to create two new VMs by cloning our template VM. To do this, use the same steps described in part 2 of this series, making sure that the you check the box to Reinitialize the MAC address of all network cards as a part of the cloning process. I am going to create two linked clones named SQL2K8R2CLSTR1 and SQL2K8R2CLSTR2 in my environment. Once the clones have been created, power them on, and follow the same steps used to configure the Domain network of the iSCSI Virtual SAN and join the VMs into the AD Domain. For this configuration, SQL2K8R2CLSTR1 will be assigned IP address 192.168.81.3 and SQL2K8R2CLSTR2 will be assigned 192.168.81.4 on the Domain network.
Once the VM clones are created, renamed, and joined into the domain using the same steps used to join the iSCSI Virtual SAN to the domain in part 2 of the series the iSCSI network adapters can be setup to begin the process of provisioning shared storage for building out the SQL Server failover cluster.
Configuring the iSCSI Network Adapters
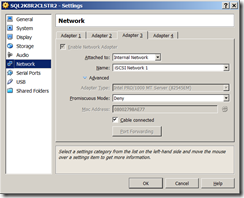
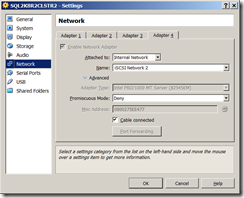
To simulate an environment with segregated traffic and multiple paths to the iSCSI SAN, we can change the configuration of the vNICs on the iSCSI Virtual SAN, and both cluster nodes to mimic separate hardware networks using the VLANs. In VirtualBox, this is really easy to do, but simply changing the name of the internal network that Adapter 3 and 4 are connected to. In this case I am going to change the internal network name from iSCSI Network to iSCSI Network 1 for Adapter 3 and iSCSI Network 2 for Adapter 4 as shown in the below screenshot.
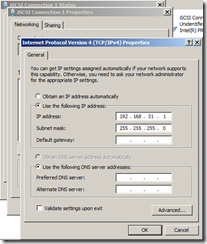
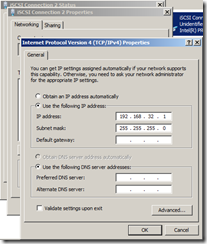
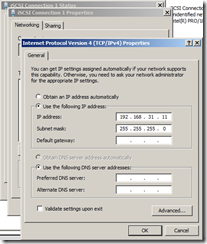
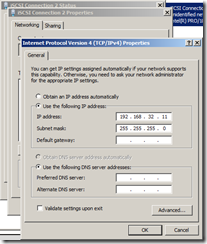
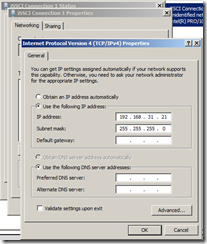
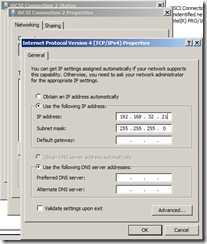
This change will be made to all three servers, and then we can configure the network settings for each so that iSCSI Network 1 uses IP subnet 192.168.31.x and iSCSI Network 2 uses IP subnet 192.168.32.x.
iSCSI Virtual SAN
SQL2K8R2CLSTR1
SQL2K8R2CLSTR2
Even though we have laid the foundation for having multiple paths to the iSCSI Target from both of our cluster nodes, for the purposes of the this weeks blog post, we are only going to make use of a single path to the iSCSI SAN, reserving the concept and discussion of multiple paths for next weeks blog post.
Configuring the iSCSI Target
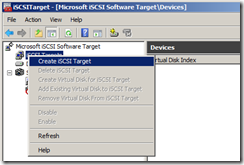
Configuring the iSCSI Target in Windows Server 2008 R2 is incredibly simple and can be accomplished in a few minutes. In fact, you will probably spend more time reading the steps to configure the Target and create the necessary Virtual Disks to support a two node failover cluster, than you will spend actually performing the steps. To begin configuring the iSCSI Target open the Microsoft iSCSI Software Target management console from Administrative Tools on the iSCSI Virtual SAN VM. Then create a new iSCSI Target by right clicking on the iSCSI Targets node and clicking on the Create iSCSI Target menu item.
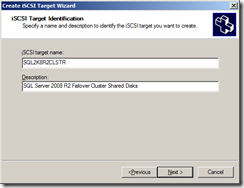
When the Create iSCSI Target Wizard opens click next and then provide a iSCSI target name and Description for the new target. In this example, I am naming the iSCSI Target SQL2K8R2CLSTR and using a description of SQL Server 2008 R2 Failover Cluster Shared Disks
On the iSCSI Initiators Identifiers screen, we are going to click the Advanced button and specify the IP addresses of the iSCSI network adapters we previously configured for the iSCSI Network 1 adapters.
After clicking the Add button on the Advanced Identifiers screen, change the Identifier Type dropdown to IP Address and then type the IP address for the SQL2K8R2CLSTR1 iSCSI Network 1 connection, 192.168.31.11 in the Value box.
Repeat these steps to configure the IP Address of the SQL2K8R2CLSTR2 iSCSI Network 1 connection, by typing 192.168.31.21 in the Value box. When the Microsoft iSCSI Software Target warning dialog pops up, click Yes to accept the configuration of multiple initiators for the target.
Then click OK to close the Advanced Initiators dialog, then click Next on the iSCSI Initiator Identifiers window, and then click Finish to configure the target.
Next, create a new virtual disk by right clicking on the Devices node and clicking on the Create Virtual Disk menu item.
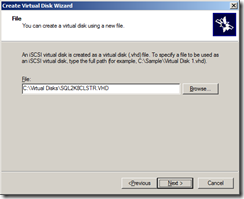
When the Create Virtual Disk Wizard pops up click Next and then specify a file location and name in the File box to store the VHD file for the new virtual disk that will be used as the iSCSI LUN for the failover cluster.
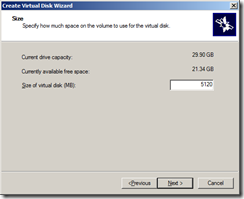
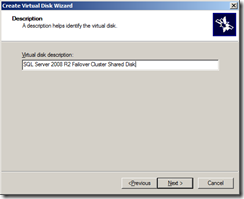
On the Size screen, specify a size for the new virtual hard disk, in megabytes, in this example I am creating a 5GB virtual hard disk which is sufficient enough for building a failover cluster for learning. Click Next to move to the Description screen where you can provide a detailed description for the Virtual Hard Disk, and then click Next.
On the Access screen click the Add button to open the Add Target dialog, and assign the Virtual Hard Disk to the SQL2K8R2CLSTR iSCSI Target that we previously created, and then click OK.
Click Next on the Add Target dialog and then click Finish to complete adding the Virtual Hard Disk to the iSCSI Target. Now repeat the steps to create another Virtual Hard Disk that is 1GB in size using the same iSCSI Target for the Failover Cluster Quorum Disk.
Configuring the iSCSI Initiators
Now that we have out iSCSI Virtual SAN configured with a clustered shared disk and quorum disk, we need to setup the iSCSI Initiator on both of the failover cluster node VMs so that they can access the disks being presented by the iSCSI Target. The first step in configuring the iSCSI Initiator was to login to the SQL2K8R2CLSTR1 VM and then open the iSCSI Initiator from Start | Administrative Tools | iSCSI Initiator. The first time that you open the iSCSI Initiator a popup dialog will open stating that the iSCSI Initiator Service is not running on the server. Click Yes on the dialog to start the service and configure it to start automatically each time the server starts.
Once the iSCSI Initiator Properties dialog opens, type the network address to the iSCSI Network 1 connection for the iSCSI Virtual SAN, 192.168.31.1, in the Target box, and then click Quick Connect. The Quick Connect dialog will open up and you can click Done to connect to the iSCSI Target.
Repeat these same steps on the SQL2K8R2CLSTR1 VM to connect the iSCSI Initiator to the iSCSI Target on the second cluster node. Then open the Computer Management MMC from Start | Administrative Tools | Computer Management, and then expand the Storage node and click on Disk Management. Right click on each of the iSCSI disks presented to the server and click on Online Disk to bring the disks online on the server.
Then right-click on one of the disks and click on the Initialize Disk menu option to initialize the disks.
Then right-click each of the disks and select the option to create a New Simple Volume, and format the disks. Assign drive letter S to the Shared Disk that is 5GB in size and format the disk using a 64K allocation unit size, naming the disk SQLData. Assign drive letter Q to the Quorum Disk that is 1GB in size, and format the disk using the default allocation unit size and name the disk Quorum Disk.
At this point the VMs are ready to begin the failover clustering build out in Windows which will be covered in the next post in this series.





One thought on “Building a Completely Free Playground for SQL Server – 3 – Creating the Failover Cluster Nodes and Configuring the iSCSI Environment”
Hi Jonathan
I had a few issues so I started again and have completed parts 1 and 2. I also completed all the steps in part 3 for SQL2K8R2CLSTR1 then powered it off. For SQL2K8R2CLSTR2, I performed the same steps with the iSCSI Initiator, but in Computer Management, I did not format the disks, I just rescanned them and they came online, so I selected the drive letters as S and Q. This seems OK, but I just want to confirm I do not have to repeat the formatting in SQL2K8R2CLSTR2 before I go on to part 4.
Thanks
Ian